Build Your First Sofa Customizer
On this page
Creating an interactive 3D sofa configurator may sound complex, but with Amaspace, it’s a straightforward and guided process. This step-by-step tutorial will walk you through building a working configurator for a multi-material, multi-color sofa—ready to deploy on your storefront.
This guide is designed for product managers, e-commerce teams, or developers setting up a customizable sofa experience for the first time.
What You’ll Learn
- How to upload your base model and supporting assets
- How to organize customization logic using categories and attributes
- How to link materials and textures to your 3D model
- How to configure rules and logic for cleaner user experience
- How to publish and preview your configurator
Step 1: Start by Creating a New Product
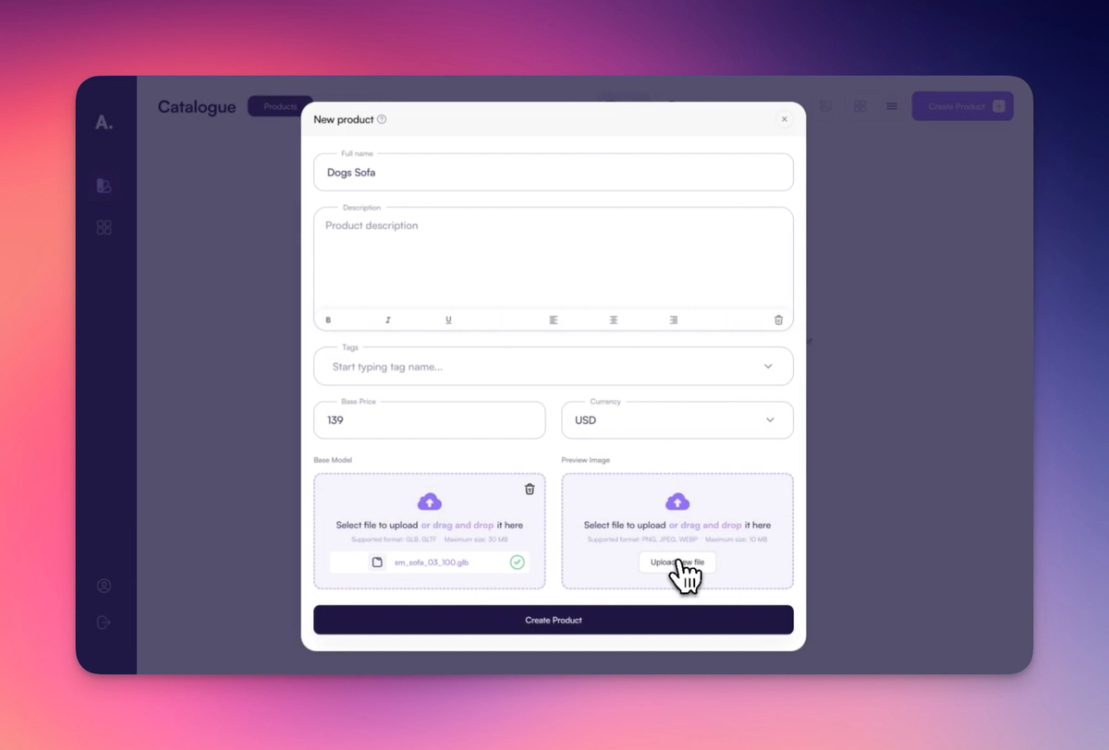
Begin by clicking "Create Product" from your dashboard. Add basic product information, such as name, description, price, and a preview image. You’ll also upload the base 3D model of the sofa—this is the foundational asset your configurator will work from.
Once created, the product will appear in your list. Click to open its internal page.
Step 2: Upload Additional Assets
Here you’ll upload the customization elements prepared by your 3D artist. In this example, we’re using two different materials, each with their own baked-in textures. These assets fall into three supported types:
- Model
- Material
- Texture
For this walkthrough, we’ll be working only with materials. These will be converted into selectable options within your configurator.
Step 3: Open the 3D Editor
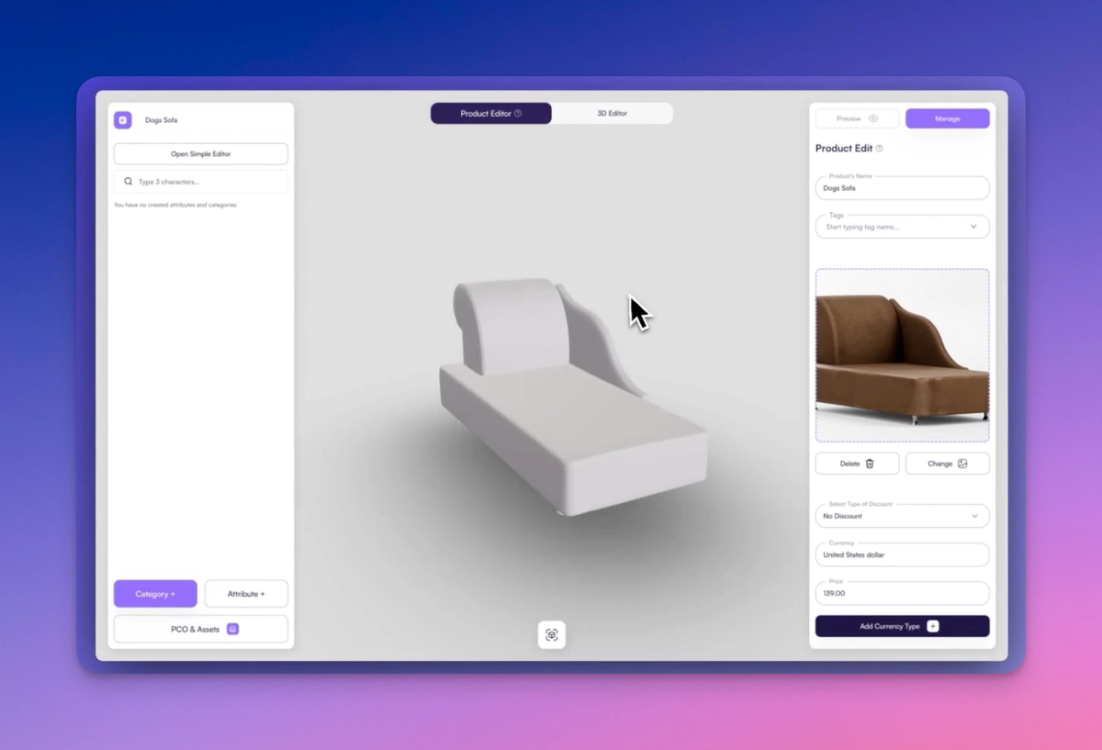
Once your assets are uploaded, click the 3D Editor button. This is where your configuration logic and presentation are defined. You’ll see two key sidebars:
- The left sidebar is where you create and organize categories and attributes
- The right sidebar is where you edit each selected item (e.g., setting defaults, linking model parts)
Step 4: Organize Attributes into a Category
In Amaspace, every set of customizable options must live inside a Category. This helps keep your editor structured and readable. For this example, create a category named something like "Sofa Material & Color."
Within this category, you’ll define attributes for each material option.
Step 5: Create Material Attributes
Now, create two separate attributes—one for each sofa material (e.g., "Fabric Options" and "Leather Options"). These will each contain a few color or texture variations that the customer can choose from.
Step 6: Add PCOs Using the Asset Library
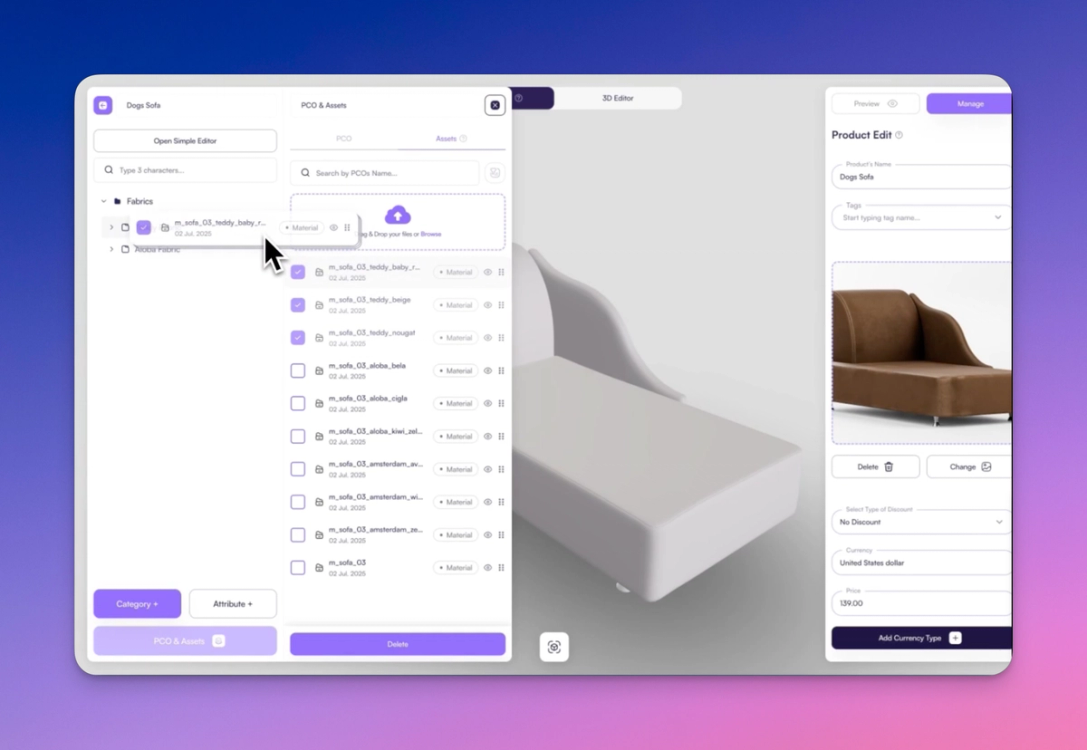
At the bottom of the left sidebar, open the Assets Library. Go to the "Assets" tab and filter by:
- Current product
- Asset type: Material
Drag the materials you want into the relevant attribute. These will be converted into PCOs (Product Customization Options). Once added, you can edit:
- Price impact
- Display name
- Preview thumbnail
- Default selected state
Step 7: Link Materials to the Model
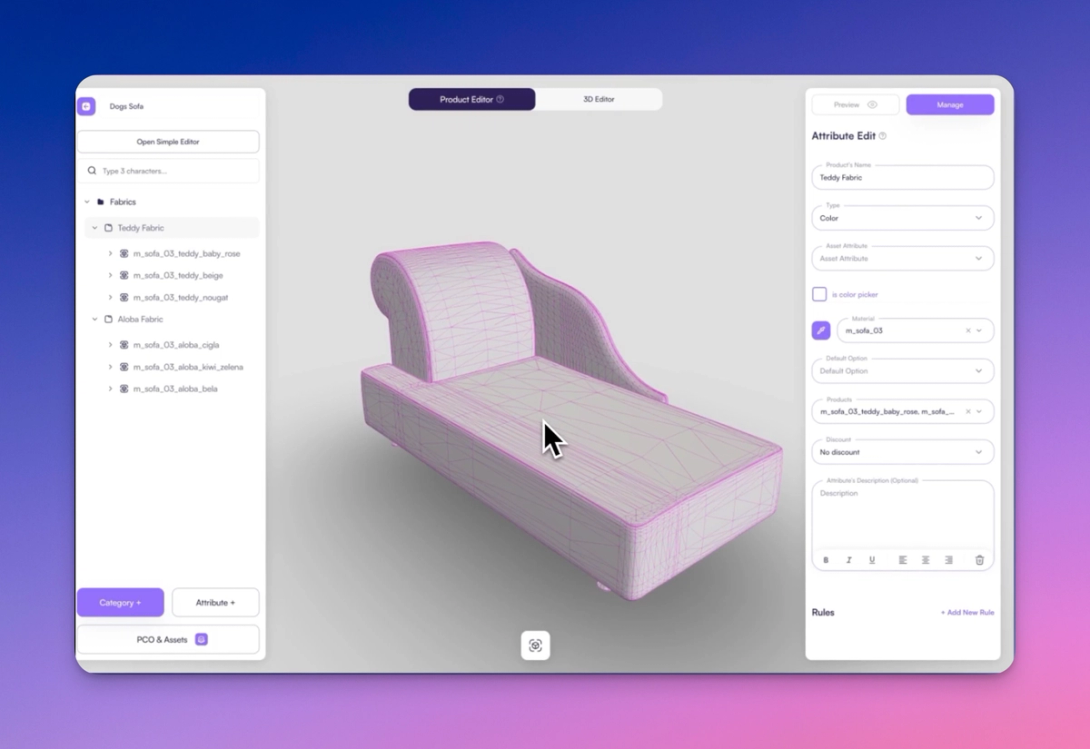
To make your options functional, you need to link them to specific parts of your 3D model.
- Select an attribute
- Use the Part Picker to click on the relevant mesh/material zone in the model
This step ensures that customer selections will visually update the model in real time.
Step 8: Set Logic Rules for Cleaner UX

You want to prevent users from selecting options from both attributes simultaneously. To do this, create rules:
- Each rule should consist of a Condition (e.g., "If Fabric is selected")
- And an Action (e.g., "Set Leather attribute to none")
You’ll need to create a rule for every conflicting combination. This ensures only one group is active at a time, and prevents inconsistent configurations.
Duplicating and editing existing rules makes this process much faster.
Step 9: Customize Camera View in Scene Editor
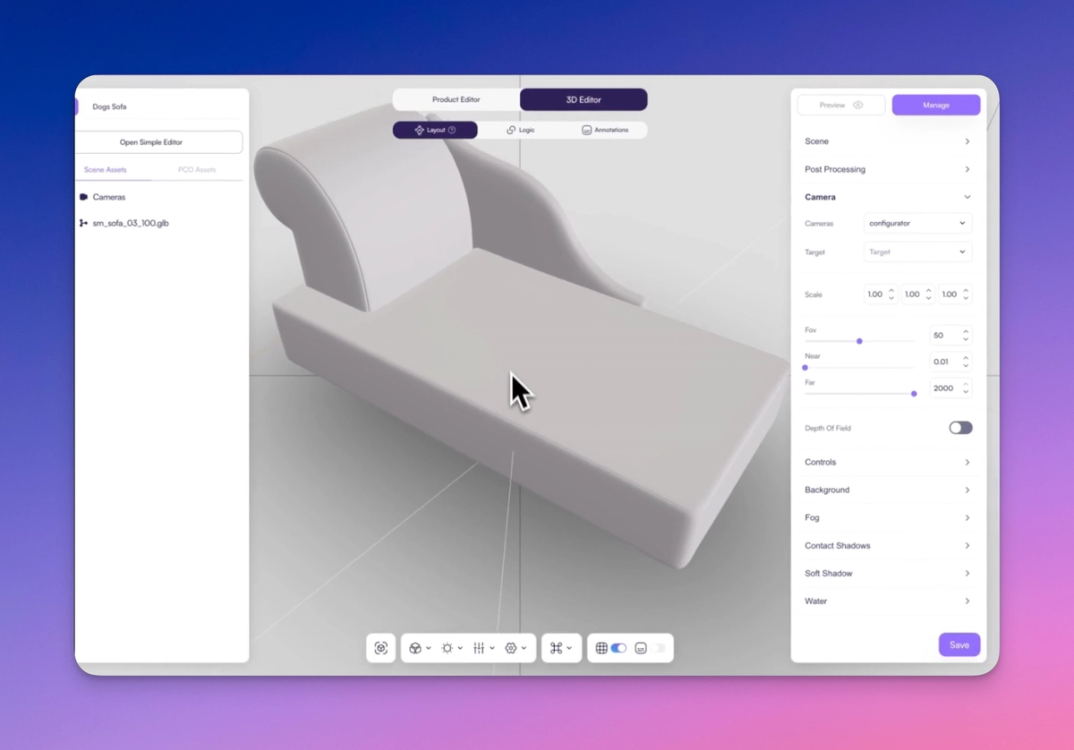
To ensure your product looks its best, open the 3D Scene Editor.
- Open the "Camera" section in the right sidebar
- Choose the
Configuratorview - Adjust the camera position with your mouse or trackpad
- Once you’ve found the ideal framing, click "Save"
This gives your users the right perspective immediately when the page loads.
Step 10: Enable a Default Environment
In the same editor, enable the default 3D environment by toggling it on. This adds a surrounding with reflective floor for a more realistic viewing experience.
Step 11: Publish Your Product
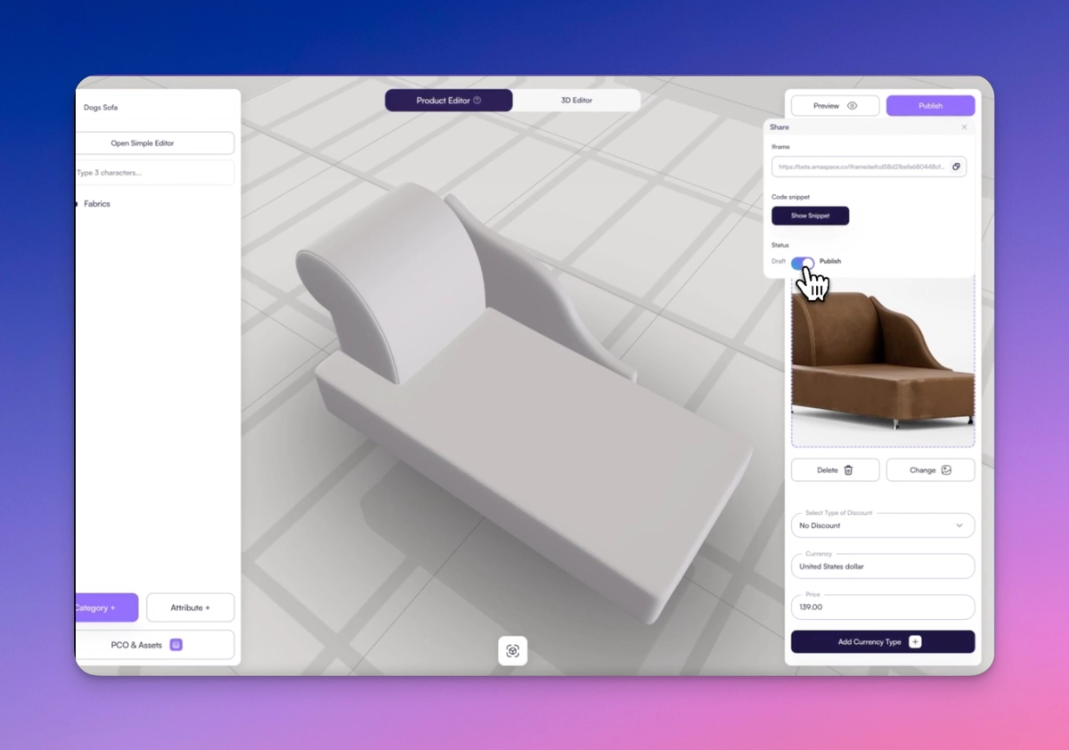
Return to the product editor and click Manage → Publish. This step makes your configurator available for live preview and testing.
Step 12: Preview and Test
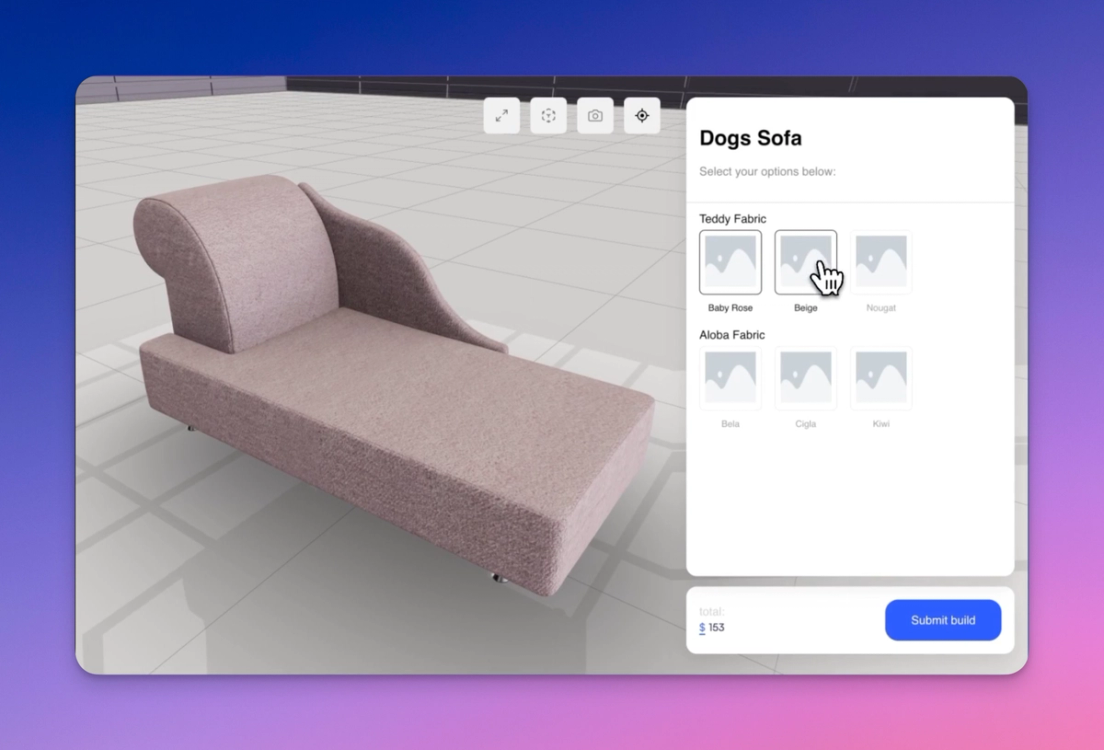
Click through your material groups and available textures. You’ll see the price update, model respond to each selection, and logic rules restrict invalid combinations.
Summary
In just a few guided steps, you’ve created a working 3D sofa configurator with:
- Two material families
- Real-time model updates
- Custom pricing logic
- Clean and user-friendly UI
This setup can serve as a repeatable framework for other product types in your catalog. If you’d like to extend this configurator with AR view or showroom integration, continue exploring our guides in the next section.
You May Also Like
Configure Amaspace in Shopify
On this page, you’ll find a step-by-step guide on how to connect Amaspace 3D Customizer to your Shopify store.
Boat Configurator End-to-end Guide
Step-by-step guide to building a boat configurator in Amaspace. Learn how to create attributes, apply colors, link assets, adjust 3D scene settings, generate branded PDF quotes, and use fully functional AR on mobile.
Augmented Reality: Enable and Customize AR
Learn how to activate native AR for your 3D product customizer. Amaspace makes it easy - no app required. iOS and Android supported via WebXR.